Thursday, December 2, 2021

Create a Blog with Google Blogger

Blogs are a great way to make public release statements for a company, create your own company website, manage a professional portfolio, or share your personality with the world. These instructions assume you already have a private Google gmail account and that you are already logged in to your private Google gmail account.


Purpose: How to create a personal Blog with Google Blogger.


  1. Click on the google apps drop down menu from your private google account.
  2. Click on the Blogger icon to open the app.


NOTE: School gmail accounts do not have access to Blogger. The school does not license Blogger support with Google. You will need to use your private gmail account; you will need to create a private gmail account if you do not already have one.

  1. The new screen that loads is your Blogger app homepage.
  2. If you have multiple blogs, they would all be listed on this page.
  3. Click the Create Blog link.

  1. A dialog box will open on your web browser.
  2. Type in the title of your blog.
  3. Depending on the theme you select for your blog, this title will be displayed on your page in different ways.
  4. Click the Next link.
  5. The name of your blog can be anything you wish and does not have to be unique from any other blog name.

  1. Choose a web address for your blog.
  2. All webpages on the internet must have a URL address. Your blog page lets you customize your URL address.
  3. Some people choose to have their own name in the URL to increase their visibility on the internet.
  4. While you can select any word you want for your URL Blogger address, the address must be available. Blogger will tell you immediately if the address isn't available.
  5. Unavailable addresses are those that are already used by other bloggers. In my example, "ENG2010" is already an active blog.

  1. Internet URL addresses can only use very specific characters.
  2. In my example, I add a hyphen; however, hyphens are not supported.
  3. Blogger will immediately inform you that you typed an invalid or unsupported character.

  1. After multiple attempts, you will find an available blog address.
  2. When you are happy with the URL, click the SAVE link.

  1. Your blog dashboard automatically loads.
  2. You can control the appearance of your blog from the dashboard.
  3. You can view all the posts you have already published to your blog.
  4. You can writer your first post by clicking + NEW POST.


All instructions and documentation written by:

Jason Lawrence documentation hub

Dr. Jason Lawrence, M.S., Ph.D.

Theory and Practice of Professional Communication
Artificial Intelligence writers, Internal Documentation, and Emergent Texts
Visit my Official Blogmy LinkedIn profileor my Web Page.

Jason Lawrence documentation hub

Find a School: Salt Lake Community College

Tuesday, October 5, 2021

No Full Text Article in the Database Search


Many articles are available in full text, through the library databases. There are several reasons there might be no full text available on a library database search: a) the journal is only available hard copy in the library, b) a full text license is not available through the library, c) the library has a full text license but not in the specific library database you are using. These instructions are for situation C. (These instructions are for Salt Lake Community College. I wrote similar instructions for SCSU.)

Purpose: How to find a full text article when there isn't a full text in the search results.

  1. In whatever library database you are using, you will always find an article that does not have full text.
  2. Review the interface; be sure there isn't an HTML or PDF for full text.
  3. Scroll down the page because the full text may be below the source information.
Jason Lawrence documentation hub

  1. If there is not full text, copy down the name of the journal. In the case of the example, the article is "Applied Artificial Intelligence."
  2. In addition, copy down the publication date. In the case of the example, the publication year is Volume 34 2020.
  3. Return to the library home page.
  4. Click on the Academic Publications icon.
Jason Lawrence documentation hub

  1. Enter the name of the journal name in the search field.
  2. For this example, I use "Applied Artificial Intelligence."
  3. Click the Search button.
Jason Lawrence documentation hub

  1. Review the list of results for the correct journal publication.
  2. Click the Full Text Access link to open the available databases. The list will identify database subscriptions with full text licenses.
  3. Select the database that has full text for the publication date you require.

NOTE: Interlibrary loan may be necessary in the following cases.

  • This example has full text in four difference databases. However, there is no full text license for the most recent 18 months. 
  • The journal publication does not appear in the search results; there is not a full text license available.
Jason Lawrence documentation hub


All instructions and documentation written by:

Jason Lawrence documentation hub

Dr. Jason Lawrence, M.S., Ph.D.

Theory and Practice of Professional Communication
Artificial Intelligence writers, Internal Documentation, and Emergent Texts
Visit my Official Blogmy LinkedIn profileor my Web Page.

Jason Lawrence documentation hub

Find a School: Southern Connecticut State University

Using Databases to Create Citations


While the library databases all have different interfaces, they all share many common functions. One function they share is the ability to save a list of research results in a style of the user's choice. These instructions show how to generate a list of references with the EBSCO Academic Search Ultimate. I choose EBSCO because it has so many brands that comply with the same interface. Ultimately, this function also serves to let the library database set up your citation styled reference for you.

Purpose: Create a list of research results, saved in the style format that matches specific citational standards


  1. Complete a search in the library database search engine.
Jason Lawrence documentation hub

  1. Review results.
  2. Click the folder icon to add useful articles to a folder.

These instructions feature only one result; however, this same procedure can be useful for many results.

Jason Lawrence documentation hub

  1. Click on the Folder View link on the right side of the EBSCO interface.
Jason Lawrence documentation hub

  1. From the list of results saved to the folder, select the ones most relevant for further research.
  2. Click on the checkbox to indicate the articles you wish to select.
Jason Lawrence documentation hub

The following step is not for printing. However, the step will yield a list of references formatted in a specified citation style.
  1. Click the Print link.
Jason Lawrence documentation hub

  1. Select the Citation Format radial button.
  2. Select MLA from the drop down menu.
  3. Click the Print button to create a printable page.

NOTE: MLA is the citational style for these instructions but other citational styles are appropriate for specific fields of research.

Jason Lawrence documentation hub

  1. Click on Cancel in the Print dialog box.
  2. The printable view still remains.
Jason Lawrence documentation hub

  1. Copy/Paste the MLA formatted citation to your paper.
  2. If there are more than one citation, they selectively copy/paste the citations to insure references retain alphabetical order on the Works Cited page of your paper.
Jason Lawrence documentation hub


All instructions and documentation written by:

Jason Lawrence documentation hub

Dr. Jason Lawrence, M.S., Ph.D.

Theory and Practice of Professional Communication
Artificial Intelligence writers, Internal Documentation, and Emergent Texts
Visit my Official Blogmy LinkedIn profileor my Web Page.

Jason Lawrence documentation hub

Find a School: Southern Connecticut State University

Saturday, October 2, 2021

Accessing SLCC Library Databases


Students at the Salt Lake Community College have the same access to library research as do the professors. These instructions lead students through the SLCC library interface to the search tools appropriate for any student's field of study. There are other instructions in the "Research" topic of this website that provide further instructions about using the databases.

Purpose: Access the SLCC online library databases


  1. Click the Current Students link on the header of the SLCC.edu website.
Jason Lawrence documentation hub


  1. Click on the Library icon from among the icon selections.
Jason Lawrence documentation hub

The library has so many options on the library's home page. For instance, the primary links are represented by the big blue icons for the library print Catalog or their collection of EBooks. An alphabetical listing of the library databases is available at the Research Databases icon link. 
 
However, for these instructions, you only need to look for a link under the "Help and Info" list of links.
  1. Review the list of "Help and Info" links.
  2. Click the printed link Research Guides.
Jason Lawrence documentation hub

The library has organized the databases by the fields of study of professor's on the campus.

These instructions will follow the path with the English link; however, students will need to conduct research with a database appropriate for their own field.
  1. Click on the English button to continue following these instructions.
Jason Lawrence documentation hub

The field will expand to provide more options available under the English link.
  1. Click the new English link that has appeared in the bullet list.
Jason Lawrence documentation hub

  1. On the new page, click the large Scholarly Sources icon.
Jason Lawrence documentation hub

This is the final library page before students will access an English discipline library database.

The drop down menu pictured here simply leads to the other areas represented by the icons in previous step of these instructions.

Other tabs provide recommendations for students who are in specific classes. The librarians have curated these resources according to student needs. For instance, students in my classes might be interested in only the databases available for their course.
Jason Lawrence documentation hub

The links are described by the librarians so that users can make informed decisions about their selection.

Jason Lawrence documentation hub

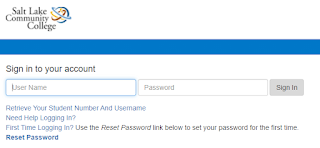
Be prepared to log in to the SLCC network to prove that you are a registered student.
Jason Lawrence documentation hub


All instructions and documentation written by:

Jason Lawrence documentation hub

Dr. Jason Lawrence, M.S., Ph.D.

Theory and Practice of Professional Communication
Artificial Intelligence writers, Internal Documentation, and Emergent Texts
Visit my Official Blogmy LinkedIn profileor my Web Page.

Jason Lawrence documentation hub

Find a School: Southern Connecticut State University

Tuesday, August 25, 2020

Uploading Iphone Pictures to OneDrive


The Apple iCloud is an impressive tool for backing up iPhone storage. However, it is also a black box in which you cannot edit the content or delete selected content. Fortunately, there is a way to back up your photos to your OneDrive account. In OneDrive, you can organize your backup, prune the files, and share photos from the backup itself--keeping your phone storage clear for more photographic and video memories.

Purpose: These instructions are for adjusting the iPhone settings to back up photos and videos to OneDrive, instead of iCloud.
 

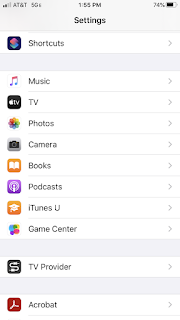
  1. Open the Settings App.

Jason Lawrence documentation hub

  1. Locate the Photos app in the list of app settings.
  2. Click on the Photos app settings.

Jason Lawrence documentation hub

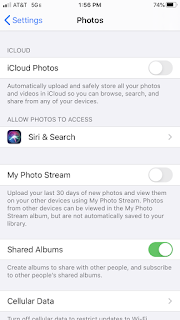
  1. Turn off the iCloud Photos back up.
  2. This will complete the preparation of the Photos app.


NOTE: The My Photo Stream setting may need to be turned off. It may interfere but I have not tested to see if this function of the iCloud is dependent on the iCloud backup.

Jason Lawrence documentation hub

Adjust the OneDrive Settings


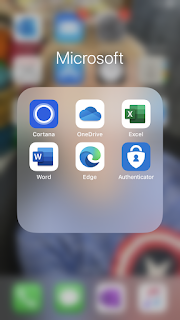
  1. Find the OneDrive app on your iPhone.
  2. Click on the app's icon.
  3. The app will open.

Jason Lawrence documentation hub

  1. If you have not already logged into your OneDrive account, you will be prompted to login.
  2. You need to open the account settings of your OneDrive app.
  3. The account settings icon is on the upper left. 
  4. In the pictured example the icon is the "JL" circle by the word "Files. 
  5. Click on the icon.
  6. The account settings options will slide out over the screen.

Jason Lawrence documentation hub

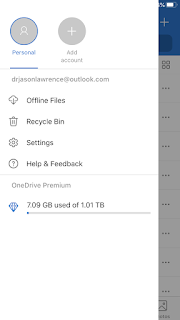
  1. This slide page lets you choose which OneDrive account you want to access.
  2. The pictured example only has one OneDrive account.
  3. Click on the Settings option.

Jason Lawrence documentation hub

  1. Click on the Camera Upload setting.

Jason Lawrence documentation hub

  1. Turn on the camera upload for your OneDrive, identified by your outlook email address.
  2. Click on Include Videos so camera upload will back up videos and photos together.

 NOTES:

Use Mobile Network is an option that will your data upload over both wi-fi and cell data transfer. If you leave it off, the camera upload will only happen on wi-fi.

Organize New Uploads lets you choose how the camera upload will be organized in the OneDrive pictures folder. This example organizes the uploads by month.

Jason Lawrence documentation hub

Delete OneDrive Pictures


  1. The camera upload sends all iPhone pictures to the Pictures folder.
  2. Open the Pictures folder.

Jason Lawrence documentation hub

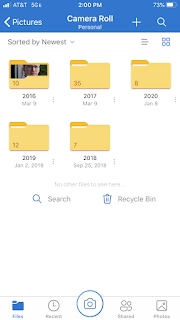
  1. The camera upload sends all iPhone pictures to the Camera Roll folder.
  2. Open the Camera Roll folder.

Jason Lawrence documentation hub

  1. Click on the year you want to manage.
  2. Your screen may differ if you used the Organize New Uploads setting to organize in another way than monthly.
  3. In the pictured example, I will click on the 2020 folder.

Jason Lawrence documentation hub

  1. The folders are numbered by month.
  2. Click on the numbered folder you want to manage.

Jason Lawrence documentation hub

  1. Select the pictures and videos you want to delete.
  2. Click on the "..." button, on the top right of the interface, to open the management options.


NOTE: If you simply wish to share the pictures, you can share directly from OneDrive. Click the Share button to send the pictures to people with another app.

Jason Lawrence documentation hub

  1. Click on the Delete button to delete all the selected pictures and videos.

Jason Lawrence documentation hub

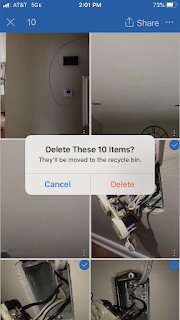
  1. OneDrive wants to confirm you really wish to delete the pictures and videos you selected.
  2. Click the red Delete confirmation button.
  3. The pictures and videos are now deleted from your back up.


Note: Untested. If the photos and videos are not deleted from your iPhone, then camera upload may upload them again.

Jason Lawrence documentation hub


All instructions and documentation written by:

Jason Lawrence documentation hub

Dr. Jason Lawrence, M.S., Ph.D.

Theory and Practice of Professional Communication
Artificial Intelligence writers, Internal Documentation, and Emergent Texts
Visit my Official Blogmy LinkedIn profileor my Web Page.

Jason Lawrence documentation hub

Find a School: Southern Connecticut State University