Tuesday, January 29, 2019

Set up Bookings with Microsoft Office 365

Microsoft Office 365 for Business comes with Bookings. This feature allows a user to publish a Bookings page on their website or position a link in their email signature. With this published Bookings page, clients and colleagues can request meetings that are recorded on your Outlook calendar. Whereas only internal employees on the Outlook network can send appointment invites through Outlook, people external to the organization are unable to set Outlook appointments. However, Bookings changes that. These instructions assume you have Microsoft Office 365 for Business and access it through the employee single-signon of Southern Connecticut State University. For further instructions about creating email signatures, use this link for the relevant instructions.

Purpose: Set up Bookings in an email.


  1. Log in to the mySCSU webpage.
  2. From among the mySCSU apps, click the Bookings button.
  3. A new page with promotional information will open.


  1. Disregard all promotional materials, unless you have the desire to read more about Bookings.
  2. Click on the Get it now button.


  1. Immediately, a small dialogue box will open.
  2. Select the Add a booking calendar option.


  1. There are two fields. In the first field, write who the Bookings is for.
  2. In the second field, write what the Bookings is for.
  3. Press the Continue button.


  1. A Just a moment box will appear, with a circle animation.
  2. The amount of time you need to wait will be determined by your computer, connection speed, and browser version.
  3. Do not push any buttons while you wait for your Bookings account to generate.

  1. The Bookings home page will open with a user friendly dashboard.
  2. The large icon buttons are designed to walk you through the set up of your Bookings account.


  1. Look at the vertical selection of navigation options on the left side of the page.
  2. Click on Business Information so that you can set up your Bookings profile. When people seek to set up an appointment, this information will be useful for external users to schedule their appointment.


  1. Fill in the Business Information fields with your own personal information.
  2. Fill in the Business hours with your daily availability.
  3. Whereas an internal colleague can view your outlook to schedule an appointment, an external user cannot see your calendar. It is best to identify the full range of your general availability.


  1. On the top left corner of the dashboard is a place for a picture or business logo.
  2. Click anywhere on the logo location to open an Bookings settings bar on the right side of the screen.
  3. Click Upload new logo.
  4. A file selection window will open.
  5. Navigate through your files to select the image of your choice.
  6. Click the Open button to open the image in the logo corner of the Bookings dashboard.


  1. From the left Navigation bar, select the Booking page link.
  2. The Booking page will open.
  3. There are many settings on this page that rely on other Bookings settings that are meant for businesses or departments with several employees sharing the same Bookings page.
  4. There are not any changes that you need to make to set up a personal Booking page.
  5. Press Save and publish at the top left of the Booking page.


  1. One of the panels on the Booking page changes to provide additional links for published Booking pages.
  2. For an email link, you need only copy the URL link in the Share your page text field.
  3. You can select the field, select all, and copy the URL.
  4. Alternatively, you can select the Copy button.

Open your email software or log in to your email browser for this next step.


  1. Highlight the text you want to make a link in your email. Once the email is sent, the email recipient can use the link to send an appointment invitation to you.
  2. In Microsoft Outlook, click on the button at the far right of the Messages ribbon.
  3. In other email programs or browsers, you need to find the option to create a hyperlink.


  1. The Edit Hyperlink dialog box will open.
  2. Paste the URL into the Address text field.
  3. Click on the OK button.
  4. You can complete your email, as needed, and send the email to your recipient. The user can use the link to set up an appointment with you.


All instructions and documentation written by:

Dr. Jason Lawrence, M.S., Ph.D.

Theory and Practice of Professional Communication
Artificial Intelligence writers, Internal Documentation, and Emergent Texts
Visit my Official Blogmy LinkedIn profileor my Web Page.

Jason Lawrence documentation hub

Find a School: Southern Connecticut State University

Planning for Launchpad Assignments (the easy way)

Some students who use Launchpad for the first time want to know the best way to find and complete assignments. These instructions assume that a student has registered a McMillan access code and has logged in to Launchpad.

Purpose: Access Launchpad assignments and easily spot their deadline.

When you login the Launchpad website, there are two ways to view the assignments and their deadlines.

Method A (Less effective)

  1. Locate the stack of blue, collapsed assignments.
  2. The deadlines are listed under Assignments.
  3. Notice the To Do button on the right.
  4. Click one of the highlighted bars to open one of the collapsed assignments. The next picture shows what that looks like

Metod B (Highly effective)

  1. On the navigation bar to the left, is a vertical list of icons.
  2. Locate the Calendar icon.
  3. Select the Calendar icon to open the calendar.
Jason Lawrence documentation hub


This view of the deadlines is confusing. The following are reasons Method A is not encouraged.

  • When I assign an exercise, test, activity, or reading, the entire unit moves to the Assignments list.
  • Only some of the assignments are marked with To Do; that means only those assignments are assigned.
  • While Launchpad pulls the entire unit over, all other assignments, without a To Do are not assigned.
  • Finally, you will need to open and collapse each unit individually to locate the due assignments.
Don't bother with Method A.

Jason Lawrence documentation hub

Method B (Highly effective)

  • The calendar identifies each individual assignment on the day it is due.
  • The entire group is not visible because only the assignment shows.
  • This is the easiest way to see the exact assignments on the exact they are due in the order they are due.
Jason Lawrence documentation hub


  1. Click on the due assignment you wish to complete, with the mouse.
  2. A message window will open with an option on the bottom left.
  3. Click on the Open button to open the assignment.
Jason Lawrence documentation hub

Several Kinds of Assignments


Quiz Assignments like this simply require the selection of the correct answer and click the Submit button. You will not get a chance to change your answer or take the quiz again.
Jason Lawrence documentation hub


Reading Assignments like this simply require you to read the assignment. There is no other action you need to take.
Jason Lawrence documentation hub

Learning Curve Assignments like this are adaptive tests that help you learn course principles. When you get a question wrong, Learning Curve will teach you and give you another chance to get it right. The test will continue running until you successfully complete the test with a high score.
Jason Lawrence documentation hub

Writing Assignments like this simply require you to read the prompt, write the required text in the field, and click the Submit button. You are encouraged to read any available reading assignments before performing writing assignments.
Jason Lawrence documentation hub

Tutorial Assignments like this require you to watch the video and respond to a question. Those questions may be quiz questions or writing prompts. Click Submit when you complete the question.
Jason Lawrence documentation hub


All instructions and documentation written by:


Dr. Jason Lawrence, M.S., Ph.D.

Theory and Practice of Professional Communication
Artificial Intelligence writers, Internal Documentation, and Emergent Texts
Visit my Official Blogmy LinkedIn profileor my Web Page.

Jason Lawrence documentation hub

Find a School: Southern Connecticut State University

Tuesday, January 8, 2019

Change default URL on LinkedIn

When you create a LinkedIn account, you start off with the default URL. That URL has numbers, digits, and symbols; it is not an easy URL to share. If you want to print your LinkedIn address on a business card, for instance, then you need a simpler URL. These instructions assume you are already logged in to your LinkedIn account.

Compare the following URLs to see which is simpler to remember:


Purpose: Change the default URL address for your LinkedIn account to a more customized name.


  • You need to access the profile in order to change the URL.
  • On the LinkedIn menu bar, click on the Me button to open a dropdown menu.
  • Click on View profile.


  • Once on the page to view the profile, look to the right of the screen, directly under the menu.
  • Click the Edit public profile & URL link.
Jason Lawrence documentation hub

  • Once again, on the top-right of the screen is a box titled Edit URL.
  • Click on the pencil icon image next to the URL.
  • This image shows the URL after I have already changed it.
Jason Lawrence documentation hub


  • LinkedIn will automatically highlight the words.
  • Type in the name you prefer for the URL.
  • Click Save.
Jason Lawrence documentation hub

All instructions and documentation written by:

Jason Lawrence documentation hub

Dr. Jason Lawrence, M.S., Ph.D.

Theory and Practice of Professional Communication
Artificial Intelligence writers, Internal Documentation, and Emergent Texts
Visit my Official Blogmy LinkedIn profileor my Web Page.

Jason Lawrence documentation hub


Find a School: Southern Connecticut State University

Monday, January 7, 2019

Posting a OneDrive link to a Blackboard Post

There are many reasons to create a hyperlink in an online text. A link provides outside sources, without the long URL web address. The link keeps online texts nice and clean. These instructions are useful for writers who want to include links in their emails, classroom discussion posts, blog posts, and message forum posts. These instructions create a link to a password protected OneDrive document.


Purpose: Create a hyperlink in a Blackboard classroom to a OneDrive document.


Microsoft OneDrive
  • Open your Microsoft account by logging in.
  • Access your OneDrive using the typical links.
  • Search among your OneDrive folders for the classroom shared folder. In these instructions, the shared folder is titled "Eng399_winter19."
Jason Lawrence documentation hub


  • Locate your document in the list of documents located in the appropriate classroom folder.
  • Selected the checkmark on the left side of the file.
Jason Lawrence documentation hub
Copy the Link Option 1
  • The first of two ways to obtain the document link is to use the right-click.
  • Right-click on the selected file.
  • Select Copy link from the dropdown menu.
Copy the Link Option 2
  • The second of two ways to obtain the document link is to use the OneDrive menu bar.
  • Locate the Copy link button on the menu bar.
  • Click on the Copy link.
Jason Lawrence documentation hub

  • Whether option 1 or option 2, a popup window will open.
  • The URL is already written in the field for you.
  • Click the Copy button.
  • Once you click on the Copy button, a green checkmark will appear on the popup, as shown in the picture.
Jason Lawrence documentation hub
Blackboard LMS

  • Open Blackboard.
  • Log in to Blackboard.
  • Access your classroom.
  • Create a discussion post or blog post, as required by course instructions.
  • Highlight the text you wish to convert into a hyperlink.
  • I select more than one word so that it is easier to spot the hyperlink.
  • Click on the hyperlink icon from the word-processing palette. 
Jason Lawrence Documentation hub


Hyperlink icon.

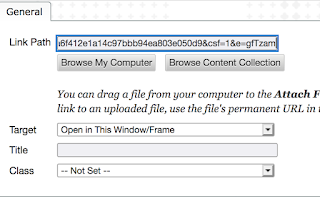
  • The hyperlink icon opens a popup screen.
  • Select the empty Linked Path field.
  • Paste the copied URL into the Link Path field.
  • You do not need to click any buttons.
Jason Lawrence documentation hub

  • Open the Target dropdown menu.
  • So that you can keep Blackboard open in a window, frame, or tab, you should click on the Open in New Window option.
Jason Lawrence documentation hub

  • Click the Insert button to complete the procedure.
  • Complete your discussion post or blog post.
  • Submit your discussion post or blog post.
Jason Lawrence documentation hub

All instructions and documentation written by:

Jason Lawrence documentation hub

Dr. Jason Lawrence, M.S., Ph.D.

Theory and Practice of Professional Communication
Artificial Intelligence writers, Internal Documentation, and Emergent Texts
Visit my Official Blog or my Web Page.

Jason Lawrence documentation hub

Find a School: Southern Connecticut State University