Saturday, October 6, 2018

Using Microsoft OneDrive Storage

OneDrive is the Microsoft cloud storage solution for Microsoft users. It is the alternative to the cloud storage of either Apple or Google. However, unlike Apple or Google, the Microsoft cloud matches the same suite of products used by traditional businesses.

Enrolled Southern Connecticut State University students have 1TB of data available in their OneDrive. Students can use their OneDrive for studies, assignments, group work, and their own personal storage. These instructions were written by a student in my Fall 2015 English 240 Professional Writing class.

Purpose: Students who wish to learn some of the basic uses of OneDrive will find these instructions useful.

Jason Lawrence Documentation Hub

Jason Lawrence Documentation Hub

Jason Lawrence Documentation Hub

Jason Lawrence Documentation Hub

Jason Lawrence Documentation Hub

Jason Lawrence Documentation Hub

Jason Lawrence Documentation Hub

All instructions and documentation written by:

Dr. Jason Lawrence, M.S., Ph.D.

Theory and Practice of Professional Communication
Artificial Intelligence writers, Internal Documentation, and Emergent Texts
Visit my Official Blog or my Web Page.

Jason Lawrence documentation hub

Find a School: Southern Connecticut State University

Downloading Office 365 for SCSU Students

Southern Connecticut State University has invested in the full Office 365 online platform to support student studies. They provide the software for free to actively enrolled students. While students already have access to the online Office 365, the full features are not available until they complete the following steps. In addition, students need to follow these instructions in order to download the full software suite to their computer device. These instructions were written by a student in my Fall 2015 English 240 Professional Writing course.

Purpose: These instructions are for enrolled SCSU students who wish to activate their Office 365 license both online and on their personal computer.

Jason Lawrence documentation hub

Jason Lawrence documentation hub

Jason Lawrence documentation hub

Jason Lawrence documentation hub

Jason Lawrence documentation hub


All instructions and documentation written by:

Dr. Jason Lawrence, M.S., Ph.D.

Theory and Practice of Professional Communication
Artificial Intelligence writers, Internal Documentation, and Emergent Texts
Visit my Official Blog or my Web Page.

Jason Lawrence documentation hub

Find a School: Southern Connecticut State University

Friday, September 14, 2018

Copy a OneDrive Document to Another OneDrive Folder

There are times when a single shared document needs to be divided into individual copies, without saving over the original document. An example might be a classroom, where the professor shares an original copy and all the students need to make their own individual assignment. In those cases, OneDrive doesn't save a new copy under a different name because OneDrive is designed for shared documents--not saving individual copies of the same document. These instructions begin the process when the original document is outside the student folder into which all the individual copies will be saved. If the file is not outside the folder then use the Move To button to change the location of the original document. These instructions are for the Apple computer, Firefox browser.

Purpose: Divide an original, shared document into multiple documents, with different file names.


Jason Lawrence documentation hub


Open your browser and log in to your Microsoft Outlook Account. Navigate through OneDrive to the appropriate folder.

Do not open the document.
  1. Locate the original document.
  2. Select the checkbox of the document. The checkbox appears when the mouse icon hangs over the area where the invisible checkbox is located.

Jason Lawrence documentation hub

  1. With the document selected, the available commands on the OneDrive ribbon will change.
  2. Click on the Copy To button to open a side bar.
Jason Lawrence documentation hub


  1. The sidebar opens the locations to which a document can be copied.  A user should not select the user's own OneDrive. In the picture, the destinations include the OneDrive account of Jason Lawrence and the OneDrive account of the user. Because users cannot Save As in a shared folder, they must Copy To a shared folder.
  2. In this picture, a user would select Jason Lawrence's shared OneDrive. 
Jason Lawrence documentation hub


  1. Navigate through the shared folders by clicking on the folder options.
  2. Do not click the Copy here button until the correct folder is opened.
  3. In this picture, "week2_classwriting" is the folder the copied document belongs.
  4. Open the final folder.
Jason Lawrence documentation hub

  1. Once the correct folder is open, click the Copy here button.
  2. In this picture, "week2_classwriting" is open.
Jason Lawrence documentation hub

  1. OneDrive will provide a notification directly under the menu ribbon. 
  2. "Copied 1 item to week2_classwriting" is an example of the feedback OneDrive provides.
Jason Lawrence documentation hub

  1. While in the folder, select the checkbox for the file.
  2. In this picture, "CH1_water_lawrence.docx" is selected from within the "week2_classwriting" folder.
Jason Lawrence documentation hub

  1. Click the Rename button from the menu ribbon.
Jason Lawrence documentation hub

  1. In this picture, the original file includes the last name "lawrence." With a copy in the appropriate folder, the user can rename the file.
Jason Lawrence documentation hub

  1. Change the name in any way that is necessary.
  2. In this picture, a student needs to rename the file with the student's last name.
  3. Once renamed, click the Save button.
Jason Lawrence documentation hub

  1. The result is a copied file, in a new folder, with a changed name.
Jason Lawrence documentation hub

All instructions and documentation written by:

Dr. Jason Lawrence, M.S., Ph.D.

Theory and Practice of Professional Communication
Artificial Intelligence writers, Internal Documentation, and Emergent Texts
Visit my Official Blog or my Web Page.

Jason Lawrence documentation hub

Find a School: Southern Connecticut State University

Friday, September 7, 2018

Saving Files on Someone Else's OneDrive Account

There are times when a single shared document needs to be resaved in a shared folder, without saving over the original document. The problem is OneDrive really isn't designed to save your own document to someone else's folder. OneDrive is designed for shared documents--not saving individual copies of the same document. These instructions begin the process when the original document is outside the student folder into which all the individual copies will be saved. If the file is not outside the folder then use the Move To button to change the location of the original document. These instructions are for the Apple computer, Firefox browser.

Purpose: These instructions will focus on saving one document as your own document, in someone else's shared folder.

Open your browser and log in to your Microsoft Outlook Account. Because a shared document was not created by you, it is not located in your Files. Therefore, the shared document will not show in the default view of your own files.
  1. On the left navigation panel, locate and select the Shared link.
  2. A list of all your shared documents will load on the screen. You only need to locate the shared folder you need for these instructions.
  3. While someone can share folders, presentations, documents, or other files (as shown in the picture), these instructions will focus on a folder that someone has shared with you. In these instructions, the shared folder is called "someone_shared_this_folder."
  4. Click on the link "someone_shared_this_folder." 

Jason Lawrence documentation hub

Inside "someone_shared_this_folder" is a selection of all the documents and folders shared by all editors and viewers of the folder.

All file and folder names are meant for these instructions. The file and folder names on your own computer screen will be different.

Jason Lawrence documentation hub


  1. Select the file you need. 
  2. A blue checkmark will indicate your file is selected.
Jason Lawrence documentation hub


  1. Click on the Open menu.
  2. Select Open in Word from the menu options.
This is a unique feature available for Microsoft's cloud solution. There is an option to either edit the document online or in the Word application on your own computer (if you own it).
Jason Lawrence documentation hub


  1. One of two dialog boxes will open. The two bullets below describe each of the dialog boxes.
  2. If Word already has permission to access your OneDrive, click the Open Link button to open the document in Microsoft in Word.

-----------------------------------------

  • (unpictured) A dialog box requesting a password will open. Microsoft Word needs the password for your OneDrive account; the application will remember your password in the future.
  • (pictured to the right) A Launch Application dialog box will appear on your screen. The dialog confirms you want to access resources located on your computer with resources you have on the internet.
Jason Lawrence documentation hub

WARNING
Don't Save the document!

Once Microsoft Word opens, you can begin editing in Word.

  1. Click on the File menu.
  2. Click on Save As... from among the file menu options.
  3. You must use Save As... for this step because you want to save the file under your own name, rather than save over the original file.
Jason Lawrence documentation hub

Rather than save the document to your own online file locations, you must save the document to the shared folder.

The shared folder will not be listed among your own online file locations.


  1. Click on Recent Folders
  2. Because you opened the document from a shared folder, the shared folder will be among the Recent Folders.
  3. Click on the shared folder. In the picture to the right, the shared folder is called "Presentation."
  4. Locate the location in the shared folder where you need to save your document. In these instructions, that location is the folder titled "water_problem_memos." The name will likely be different on your own computer.
  5. The file name will retain the filename of the original document. Click on "Lawrence" in the Save As file naming prompt. In this example, the new file name includes the last name of "anderson."
  6. Click the Save button at the bottom of the dialog box.
Jason Lawrence documentation hub


All instructions and documentation written by:

Dr. Jason Lawrence, M.S., Ph.D.

Theory and Practice of Professional Communication
Artificial Intelligence writers, Internal Documentation, and Emergent Texts
Visit my Official Blog or my Web Page.

Jason Lawrence documentation hub

Find a School: Southern Connecticut State University

Monday, July 16, 2018

Attaching Multiple Documents to Assignment Submissions

To ensure that everyone receives a fair grade, based on reliable criteria, all assignment feedback is written directly onto the assignment sheets and general rubric. The objective is to highlight words in the published criteria, rather than write inconsistent feedback notes at the end of the assignment. That means, online students must attach three documents with each submission:

  • The assignment description
  • The general rubric
  • The student's assignment

The following instructions are for students submitting the three required documents for a Case 1 assignment in an English 304 class. However, these Blackboard images are the same for any class because the procedure is the same for every class.

Purpose: Students must submit three documents to Blackboard with each assignment. This way, I can write feedback directly on the assignment.

Log in to Blackboard and locate the appropriate assignment.

1. Click the Case 1 Submission Tool link.

The title of the link will differ in different classes.


Blackboard will load a screen where users can attach multiple documents. This image does not yet show any documents loaded.

2. Click the Browse My Computer button, located in the center of the page.


A dialog box will open for the personal computer. Users need to navigate their file structure to locate the appropriate files.

3. Select the assignment.
4. Click the Open button.

5. Click the Browse My Computer button, located in the center of the page.

6. Select the general rubric.
7. Click the Open button.
8. Click the Browse My Computer button, located in the center of the page.

9. Select the assignment description.
10. Click the Open button.

All three documents should be portrayed at the center of the page.

11. Click the Submit button to submit the assignment, with the necessary documents.

All instructions and documentation written by:

Dr. Jason Lawrence, M.S., Ph.D.

Theory and Practice of Professional Communication
Artificial Intelligence writers, Internal Documentation, and Emergent Texts
Visit my Official Blog or my Web Page.

Jason Lawrence documentation hub

Find a School: Southern Connecticut State University

Monday, July 9, 2018

Submitting Posts to Discussion Forums

Each week, students need to post to the discussion forums on Blackboard. Sometimes, I title those discussion forums in different ways to match the course goals. For instance, the pictured examples below refer to the discussion forums as "Weekly Iterations." Regardless of the name "Weekly Iterations" in the instructions below, the instructions are about submitting a post to the discussion forums.

Purpose: Students need to follow these instructions in order to submit discussion posts in the Blackboard LMS classroom.


Jason Lawrence documentation hub

Jason Lawrence documentation hub

Jason Lawrence documentation hub


All instructions and documentation written by:

Dr. Jason Lawrence, M.S., Ph.D.

Theory and Practice of Professional Communication
Artificial Intelligence writers, Internal Documentation, and Emergent Texts
Visit my Official Blog or my Web Page.

Jason Lawrence documentation hub

Find a School: Southern Connecticut State University

Opening Blackboard Discussion Word Processing Tools

The Blackboard LMS includes discussion forums. A student can write a post submission in Microsoft Word and then attach that Word document to a post. However, the teacher needs to download the document, open Microsoft Word, read the document in Word, and return to Blackboard to grade the post. A teacher must repeat that procedure every time a student posts a submission in an attachment.

Purpose:
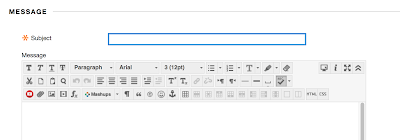
Alternatively, students should write their submissions in the discussion forum interface, rather than attach a Word document. Blackboard does provided limited word processing to support formatting discussion posts. These instructions help students access the word processing tools that come in the Blackboard discussion forum interface.


1. Locate the discussion forum in Blackboard.
2. Click on the discussion forum link.
3. Click on Create Thread.
Jason Lawrence documentation hub

The natural state of discussion forums only reveals a single line of a few word processing tools.

4.Jason Lawrence documentation hub
Click the Show More button.
Jason Lawrence documentation hub

The result is three rows of word processing tools. These tools will be sufficient for most discussion forum submissions.
Jason Lawrence documentation hub


All instructions and documentation written by:

Dr. Jason Lawrence, M.S., Ph.D.

Theory and Practice of Professional Communication
Artificial Intelligence writers, Internal Documentation, and Emergent Texts
Visit my Official Blog or my Web Page.

Jason Lawrence documentation hub

Find a School: Southern Connecticut State University