Tuesday, August 25, 2020

Uploading Iphone Pictures to OneDrive


The Apple iCloud is an impressive tool for backing up iPhone storage. However, it is also a black box in which you cannot edit the content or delete selected content. Fortunately, there is a way to back up your photos to your OneDrive account. In OneDrive, you can organize your backup, prune the files, and share photos from the backup itself--keeping your phone storage clear for more photographic and video memories.

Purpose: These instructions are for adjusting the iPhone settings to back up photos and videos to OneDrive, instead of iCloud.
 

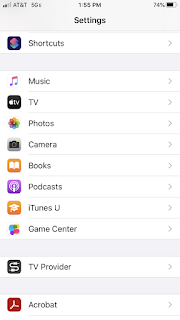
  1. Open the Settings App.

Jason Lawrence documentation hub

  1. Locate the Photos app in the list of app settings.
  2. Click on the Photos app settings.

Jason Lawrence documentation hub

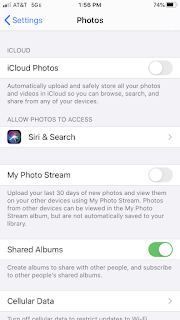
  1. Turn off the iCloud Photos back up.
  2. This will complete the preparation of the Photos app.


NOTE: The My Photo Stream setting may need to be turned off. It may interfere but I have not tested to see if this function of the iCloud is dependent on the iCloud backup.
Jason Lawrence documentation hub

Adjust the OneDrive Settings


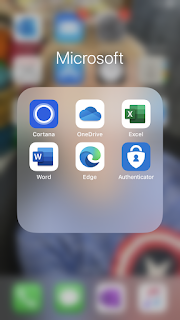
  1. Find the OneDrive app on your iPhone.
  2. Click on the app's icon.
  3. The app will open.

Jason Lawrence documentation hub

  1. If you have not already logged into your OneDrive account, you will be prompted to login.
  2. You need to open the account settings of your OneDrive app.
  3. The account settings icon is on the upper left. 
  4. In the pictured example the icon is the "JL" circle by the word "Files. 
  5. Click on the icon.
  6. The account settings options will slide out over the screen.

Jason Lawrence documentation hub

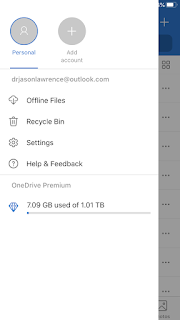
  1. This slide page lets you choose which OneDrive account you want to access.
  2. The pictured example only has one OneDrive account.
  3. Click on the Settings option.

Jason Lawrence documentation hub

  1. Click on the Camera Upload setting.

Jason Lawrence documentation hub

  1. Turn on the camera upload for your OneDrive, identified by your outlook email address.
  2. Click on Include Videos so camera upload will back up videos and photos together.

 NOTES:

Use Mobile Network is an option that will your data upload over both wi-fi and cell data transfer. If you leave it off, the camera upload will only happen on wi-fi.

Organize New Uploads lets you choose how the camera upload will be organized in the OneDrive pictures folder. This example organizes the uploads by month.

Jason Lawrence documentation hub

Delete OneDrive Pictures


  1. The camera upload sends all iPhone pictures to the Pictures folder.
  2. Open the Pictures folder.

Jason Lawrence documentation hub

  1. The camera upload sends all iPhone pictures to the Camera Roll folder.
  2. Open the Camera Roll folder.

Jason Lawrence documentation hub

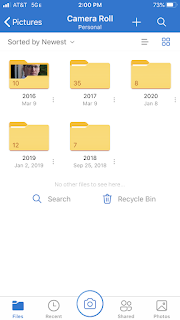
  1. Click on the year you want to manage.
  2. Your screen may differ if you used the Organize New Uploads setting to organize in another way than monthly.
  3. In the pictured example, I will click on the 2020 folder.
Jason Lawrence documentation hub

  1. The folders are numbered by month.
  2. Click on the numbered folder you want to manage.

Jason Lawrence documentation hub

  1. Select the pictures and videos you want to delete.
  2. Click on the "..." button, on the top right of the interface, to open the management options.


NOTE: If you simply wish to share the pictures, you can share directly from OneDrive. Click the Share button to send the pictures to people with another app.

Jason Lawrence documentation hub

  1. Click on the Delete button to delete all the selected pictures and videos.

Jason Lawrence documentation hub

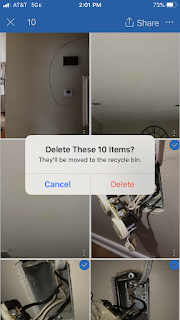
  1. OneDrive wants to confirm you really wish to delete the pictures and videos you selected.
  2. Click the red Delete confirmation button.
  3. The pictures and videos are now deleted from your back up.


Note: Untested. If the photos and videos are not deleted from your iPhone, then camera upload may upload them again.
Jason Lawrence documentation hub


All instructions and documentation written by:

Jason Lawrence documentation hub

Dr. Jason Lawrence, M.S., Ph.D.

Theory and Practice of Professional Communication
Artificial Intelligence writers, Internal Documentation, and Emergent Texts
Visit my Official Blog, my LinkedIn profile, or my Web Page.

Jason Lawrence documentation hub

Find a School: Southern Connecticut State University

Friday, May 8, 2020

Finding Full Text Articles

While a library database may have an abstract for a search result, that library database may not have the license to provide "full text" for that particular publication. These instructions begin with a search result that does not include full text. (These instructions are for Southern Connecticut State University. I wrote similar instructions for SLCC.)

NOTE: These instructions are for a Wall Street Journal article originally found on Academic Search Premier, while the "full text" was available on ProQuest Newspapers; your own results will be different if you are looking for your own article.

Purpose: How to use library databases to find the full text for an article.

These instructions begin with search results, rather than explain how to find search results. Use this link to find instructions for finding search results.

The library database provides tools to find "full text" sources for which your local library has a license.

Jason Lawrence documentation hub
  1. While many search results include full text, as either HTML or PDF, the pictured article here is a search result that does not provide a full text result.
  2. Look for the Find Article @ SCSU link  at the bottom of the entry. This link will help you find the "full text."
  3. Click on the link.
Jason Lawrence documentation hub
  1. This screen provides information on the SCSU collection of any publication source.
  2. Click on the icon of a computer laptop to find the library's online resources for that publication.
Jason Lawrence documentation hub
  1. The library has subscriptions to many library databases that have a license for either "abstract-only" or the "full text."
  2. By using the Find Article @ SCSU link, the results will only be library databases that have "full text."
  3. For the example pictured in these instructions, there are two different ProQuest databases that have a full text license.
  4. For these instructions, I clicked on the first link to ProQuest Newspapers Wall Street Journal.
Jason Lawrence documentation hub

  1. For the example pictured in these instructions, the interface looks like the picture here.
  2. Scan the entry for the option to search within the publication. Different library databases place the search field in different parts of their interface.
  3. In order to directly to the article I want, I typed in the first words of the article's title.
  4. The first words of your own title search may be different.
Jason Lawrence documentation hub

  1. The list of search results will load. However, the first result on the list is the article I am looking for.
  2. At the bottom of the entry is a Full Text link.
  3. Click the Full Text link to read your article.
Jason Lawrence documentation hub
IMPORTANT: if you use the full text article you find, be sure to cite the library database you used to read the full text. In the case of these instructions, the database is the ProQuest Newspapers Wall Street Journal.

  1. Many library databases provide the citations for you.
  2. Search the interface for some kind of option. The library databases differ wildly.
  3. For these instructions, click on the Cite icon available in the upper right of the ProQuest database pictured in these instructions.
Jason Lawrence documentation hub
  1. A dialog box appears.
  2. Click on the Citation Style drop down menu to select the citation style you need for your paper.
  3. For these instructions, I have selected MLA 7th edition.
  4. Upon the selection of the citation style, the citation format will automatically generate.
  5. Copy and Paste the citation to your Works Cited page.

Jason Lawrence documentation hub


All instructions and documentation written by:

Jason Lawrence documentation hub

Dr. Jason Lawrence, M.S., Ph.D.

Theory and Practice of Professional Communication
Artificial Intelligence writers, Internal Documentation, and Emergent Texts
Visit my Official Blog, my LinkedIn profile, or my Web Page.

Jason Lawrence documentation hub

Find a School: Southern Connecticut State University

Monday, April 27, 2020

Making a Call in Microsoft Teams

Microsoft Teams has replaced Skype for Business. That means organizations can still perform conference calls but Microsoft has added the power of their OneDrive cloud solutions to the conference technology. These instructions are for students, employees, and faculty who wish to call other people on the SCSU network.

Purpose: Make a call to a SCSU class peer or a fellow SCSU colleague.


  1. Log in to your Microsoft Account.
  2. Click on the Teams icon from the list of Apps.
Jason Lawrence documentation hub


  1. To make a call, click on the Calls button from the side navigator.
  2. While there are many ways to make a call, these instructions will make a call from the SCSU email directory.
  3. Click on Make a Call, at the bottom of the screen.
Jason Lawrence documentation hub


  1. An interface pops up, with suggested names from your contact history.
  2. Activate the Type a Name field with a click of your mouse. This field operates just like the address field of an email.
  3. Type the last name of the SCSU person you wish to call. A list of matches will automatically populate.
  4. Select the name you wish to call.

MULTIPLE CALLERS: After adding the first name, and before clicking Make the Call, you can add additional names to the call.
Jason Lawrence documentation hub

  1. For audio-only calls, click on the phone icon.
  2. For audio/video calls, click on the video icon.

Jason Lawrence documentation hubJason Lawrence documentation hub

  1. The call will begin as soon as the recipient answers the call.
  2. An audio-only call will only display your initials icon, without any picture.
  3. An audio/video call will display the video feed as shown in this picture.
Jason Lawrence documentation hub


All instructions and documentation written by:

Jason Lawrence documentation hub

Dr. Jason Lawrence, M.S., Ph.D.

Theory and Practice of Professional Communication
Artificial Intelligence writers, Internal Documentation, and Emergent Texts
Visit my Official Blog, my LinkedIn profile, or my Web Page.

Jason Lawrence documentation hub

Find a School: Southern Connecticut State University

Friday, April 24, 2020

Using Blackboard to Email Students or Groups

Blackboard provides a way for students to contact each other, even if they haven't exchanged emails. In my own classes, I create a "Communication Hub" where I place all the announcements and communication tools. On my blackboard site, the tool is called "Blackboard Email." This tool lets students email eachother or email the group to which they have been assigned.

Purpose: These instructions will help students using blackboard to send email messages to select students or to groups.


  1. Classes will differ according to the customization preferences of the instructor.
  2. Click the email link. In my classes, click Blackboard Email.
Jason Lawrence documentation hub


A screen will open with several options.
  • Choose All Student Users if you wish to send an email to the entire class.
  • Choose All Instructor Users if you want to send an email to the professor and any instructor assistants.
  • Choose Select Users to pick one or more fellow classmates you wish to email.
  • Choose Select Groups if you are assigned to a group and you want to send an email to your group members or the members of another group.
  1. For these instructions, choose Select Users.
Jason Lawrence documentation hub
The left box is a list of all the students in your class. The right box is a list of the student(s) you wish to email.

  1. When the page first loads, the right box will be empty.
  2. Select the name you want to email and click the arrow icon to move the name from the left box to the right box.
  3. Continue to select names if there are more than one.
NOTE: the list of names are whited out to protect the privacy of students. Selected names are blacked out.
Jason Lawrence documentation hub

  1. Blackboard will not send messages if they do not have a Subject.
  2. Of course, you will want to write a message in the Message field.
Jason Lawrence documentation hub

  1. Click the Submit button when you are ready to send your email.
Jason Lawrence documentation hub
ALTERNATIVE

  1. Instead of choosing Select Users, you can check Select Groups.
  2. The same box interface will appear with the list of groups.
  3. Select the group you wish to email in the same manner as described above.
Jason Lawrence documentation hub

All instructions and documentation written by:

Jason Lawrence documentation hub

Dr. Jason Lawrence, M.S., Ph.D.

Theory and Practice of Professional Communication
Artificial Intelligence writers, Internal Documentation, and Emergent Texts
Visit my Official Blog, my LinkedIn profile, or my Web Page.

Jason Lawrence documentation hub

Find a School: Southern Connecticut State University

Thursday, March 26, 2020

Joining Microsoft Teams Meetings

Microsoft Teams is an amazing technology for teams to share Microsoft Office files and collaboration by text, audio, and video. A team can create a meeting and join the meeting right in the Team interface. These instructions are for using Microsoft Teams on a Laptop or Desktop.

Purpose: These instructions are for joining a Microsoft Team meeting.

Recommendation: Before a meeting, open up other tabs to online tools you need for the meeting. In this way you can continue to participate in the meeting, without leaving the meeting or losing focus on the meeting.
Jason Lawrence documentation hub


  1. Open the SCSU apps portal.
  2. Make sure Blackboard is open.
  3. Scroll down the page to find Teams.
  4. Click on the Teams link.
Jason Lawrence documentation hub

  1. After you click Teams, a screen with your teams will open.
  2. Make sure to enter the team for which the meeting is scheduled.
  3. The picture to the right shows what your team might look like.
Jason Lawrence documentation hub
Note: If you are on more than one team, you may need to click on All Teams and make sure you are in the correct team.

  1. The Team's feed has multiple channels.
  2. The General channel is the default channel.
  3. Look through the channel feed for the meeting.
  4. As shown on the right, the current meeting is clearly highlighted.
  5. Click on the Join button to join the meeting.
Note: Previous meetings are still logged on the feed but they are not the highlighted, current meeting.
Jason Lawrence documentation hub


The meeting interface looks something like this.

The bar in the center of the screen only appears when you activate the mouse over the video image.

As an attendee, make sure your microphone is muted.

You can choose whether to turn your camera on or leave it off.

Jason Lawrence documentation hub

There are two important buttons on the meeting bar.

  1. When you first enter a meeting, the participants are listed on a sidebar to the right. 
  2. If you click Hide participants the sidebar will disappear.
Jason Lawrence documentation hub

  1. When you first enter a meeting, click on the Show conversation button.
  2. This will replace the participant sidebar with the conversation sidebar.
  3. You will see all the chat comments made by your peers on the conversation sidebar.
Jason Lawrence documentation hub
I wrote advice on the conversation sidebar pictured on the right.

  • All the chats from your peers are here.
  • Everyone can see all content posted here.
  • The thumb emoji is great for when I ask questions of the entire class.
  • Do not use the GIFs. They are too distracting.
  • The field at the bottom is where you write your thoughts or questions.
  • Click the paper airplane icon to send your chat message.
Jason Lawrence documentation hub

All instructions and documentation written by:

Jason Lawrence documentation hub

Dr. Jason Lawrence, M.S., Ph.D.

Theory and Practice of Professional Communication
Artificial Intelligence writers, Internal Documentation, and Emergent Texts
Visit my Official Blog, my LinkedIn profile, or my Web Page.

Jason Lawrence documentation hub

Find a School: Southern Connecticut State University